
Setting Up Amazon SES
This guide shows you how to connect Amazon SES to Cyber Mail 9000 so you can send campaigns from your own brand.
If you already have an AWS account, this takes 5 minutes. If not, more like 15-20.
What is Amazon AWS? And Amazon SES?
AWS stands for “Amazon Web Services.” There are a ton of services, features, software, etc, one of which is “SES”, which stands for Simple Email Service.
SES is like a “behind-the-scenes” technology that ACTUALLY sends emails.
Why do we have to set up this thing with Amazon?
ALL email providers (Mailchimp, Mailerlite, Kit, Drip, Flodesk, etc, etc) use behind-the-scenes tools like SES to send emails!
Tools like Cyber Mail 9000 is your “user interface” for composing emails, segmenting subscribers, configuring which emails send to whom, and when…etc!
Those OTHER providers pay the Amazon SES fee ($0.10 per 1,000 emails), and charge you much, MUCH more than that.
Cyber Mail 9000 cuts out the “middle man,” saving you a bunch of money (especially in the long run!)
Before You Start
You will need:
- A domain name or sender email address you control (i.e. pete@petemcpherson.com)
- Access to your DNS settings (i.e. often where you bought your domain! Cloudflare, Namecheap, GoDaddy, etc.)
- A Cyber Mail 9000 account (duh)
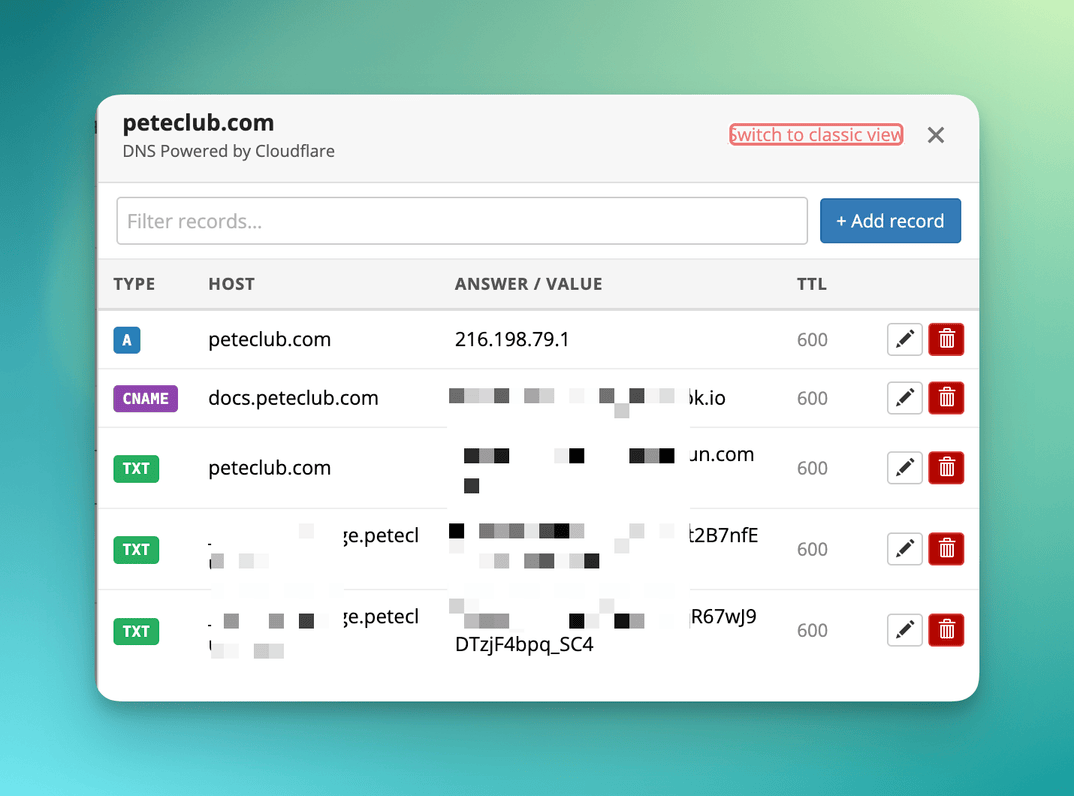
DNS areas often look like this 👇
Step 0: Sign up for an Amazon AWS account
It’s free and just takes a few minutes.
NOTE that this is SEPARATE from your Amazon.com login information!
- Head to aws.amazon.com.
- Click the
Create Accountbutton - Enter your email address (and an account name)
- Click the button, then head to your email and click the verification link
- Set a password
- On the “Choose a Plan” page, choose
FREEfor now - Enter billing info (I think they charge you $1 USD as a “hold”)
- Follow the next 2-3 steps until you are in your AWS
Console, a.k.a. your dashboard!
You now have an AWS account.
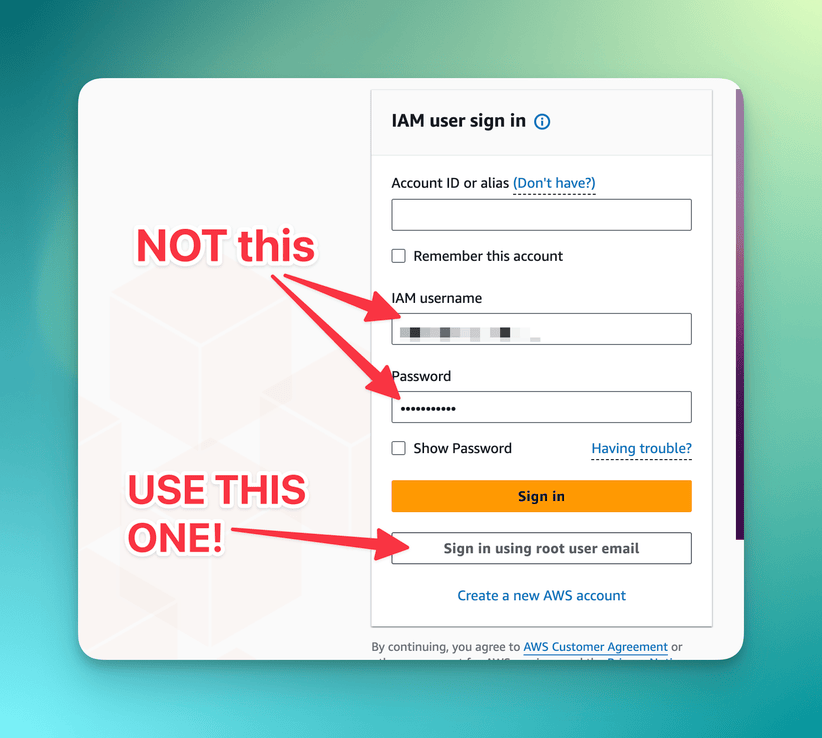
NOTE: When you return to aws.amazon.com to log in, log in as the "root" user. 👇
QUICK TIP: Navigating AWS can be a pain. Use the top-left search bar and type in stuff like “IAM” or “SES”…it’s faster!
Step 1: Create an IAM User
Think of “IAM User” like “an integration.”
You’ll create a dedicated AWS user for Cyber Mail 9000 (a.k.a the integration) instead of using your root AWS credentials.
- In AWS, open IAM -> Users -> Create user
- Name it something like
cybermail9000-ses - Choose Attach policies directly
- Add the
AmazonSESFullAccesspolicy - Complete user creation
- Open the new user -> Security credentials -> Create access key
- Choose Application running outside AWS
- Copy the Access Key ID and Secret Access Key
Keep this tab open for now, You will paste these values into Cyber Mail 9000 in a moment!
Step 2: Go back to Cyber Mail 9000 and paste in those SES Credentials
SES configuration is saved per brand.
- Open your brand’s edit page, /brands
- Find the AMAZON SES CONFIGURATION panel
- Fill in:
FROM NAME(if not already there)FROM EMAIL(if not already there)AWS ACCESS KEY IDAWS SECRET ACCESS KEYAWS REGION(IMPORTANT!! SEE STEP 3 BELOW!)
- Click Save
If SES was already configured before, the page will show: SES is configured. Enter new credentials below to update.
Step 3: Choose Your SES Region
You’ll choose this in Cyber Mail 9000 brand settings, AND in step 4 below, you'll need to double-check that the correct region is selected!
Common regions:
us-east-1(N. Virginia)us-west-2(Oregon)eu-west-1(Ireland)ap-southeast-1(Singapore)
Use the same region for:
- Identity verification in AWS SES
- The
AWS REGIONfield in Cyber Mail 9000
If these do not match, sending will fail.
I recommend choosing the one closest to your location.
Step 4: Verify a “Sending Identity” in SES (your domain name)
In AWS,
- Navigate to “Simple Email Service” (SES) via the top left search bar.
- DOUBLE-CHECK THAT THE CORRECT
REGIONIS SELECTED IN THE TOP RIGHT!! If not, select the correct one. - Go to -> Identities (left sidebar)
- Go to -> Create identity.

You can verify either:
- A full domain (recommended for long-term sending), or
- A single sender email (quickest to get started)
Option A: Verify Domain (Recommended)
- Choose Domain
- Enter your domain (example:
yourdomain.com) - Make sure Easy DKIM is enabled
- Choose the “RSA_2048_BIT” signing length
- Add the 5 DNS records AWS provides (4 under DKIM and 1 under (DMARC) at the bottom)
- Wait until SES shows status Verified (could take an hour or two—you can hit the “refresh icon” at the top of the page to check instantly!)
IMPORTANT: Some DNS providers (but not all) will automatically add the ".yourdomain.com" onto the end of the CNAME name.
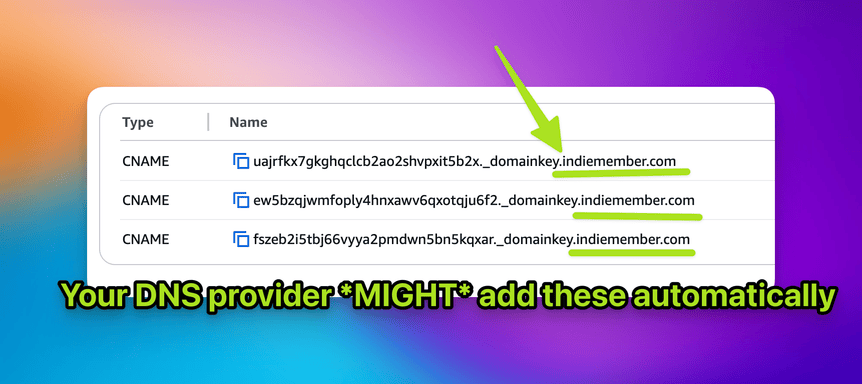
If your DNS provider DOES, just delete the “.yourdomain.com” from the CNAME name you paste in.
After domain verification, you can send a test email (right there on the “Identity” screen in SES!) via your addresses at that domain (for example, hello@yourdomain.com).
Option B: Verify Single Email
- Choose Email address
- Enter your sender email
- Open the verification email from AWS and confirm
- Wait until SES shows status Verified
Step 5: Request Production Access
New SES accounts usually start in sandbox mode. This is normal!
In sandbox mode:
- You can only send to verified email addresses/domains
- You have a low daily cap (commonly 200/day)
- You have a low send rate (commonly 1/sec)
To send campaigns normally, request production access.
Where to find the form
- In AWS, open SES -> Account dashboard
- Click Request production access
- Complete the form and submit
How to fill out the form (recommended)
- Mail type: Choose
Marketingfor newsletters/campaigns (orTransactionalif that is truly your use case) - Website URL: Add your real website URL so AWS can review your business context
- Terms checkbox: Check the agreement box, then submit
Amazon AWS will open a support ticket automatically, and they will email you asking for more information! This is common, not a rejection.
What AWS wants to see
AWS is trying to confirm you will only email people who opted in.
Your approval odds improve when you clearly explain:
- Who you send to (opted-in subscribers)
- How your list is built (forms, lead magnets, customer signup, etc.)
- Sending frequency (for example, weekly newsletter)
- How you handle unsubscribes, bounces, and complaints
- A real website they can review
- A sample campaign/email that represents what you send
Expect a follow-up email from AWS Support
Use this as a starter response:
We send emails only to users who explicitly signed up on our website. Our list is built through first-party opt-in forms; we do not buy or rent email lists. We typically send [X times per week/month]. Each email includes unsubscribe options, and we process unsubscribes immediately. We monitor bounces and complaints and remove problematic recipients. We manage campaign sending and list hygiene through Cyber Mail 9000. Website: [your URL] Attached: sample campaign email content.
Typical approval timeline
Many accounts are reviewed in 24-48 hours, but delays can happen.
You can continue testing in sandbox mode while waiting.
Step 6: Send a Test Email in the Cyber Mail 9000 dashboard
On the same brand edit page, use the Test Email section.
- Set
FROM EMAILto a verified SES sender - Enter
TEST EMAIL ADDRESS - Click SEND TEST EMAIL
- Confirm that the message arrives in your inbox (check spam if you don’t see it within a minute or two!)
In sandbox mode, the test recipient must also be verified in SES.
Common Errors
“Email address is not verified”
Your sender is not verified in SES, or you are in sandbox mode sending to an unverified recipient.
“The security token included in the request is invalid”
Your AWS key or secret is incorrect. Recopy both credentials and save again.
Endpoint or region-related send failures
Your AWS REGION in Cyber Mail 9000 does not match the region where SES identity was verified.
Security Notes
Cyber Mail 9000 stores SES credentials encrypted at rest (AES-256) and only decrypts them server-side for sending operations.
Your raw AWS secret is never returned to the browser after save.
Next Steps
After SES setup is complete:
- Import contacts in
Subscribers - Create a broadcast in
Broadcasts - Send a campaign using your configured brand sender