
Setting Up SendGrid (SMTP)
Most people should use Amazon SES instead. SES is the recommended, cheapest way to send. Only use SendGrid if your Amazon SES account got stuck in “sandbox” mode (Amazon wouldn’t approve you to send real campaigns) and you need another option.
If you haven’t tried SES yet, start with the Amazon SES guide first.
This guide shows you how to connect a SendGrid account to Cyber Mail 9000 so you can send your campaigns through them.
It takes about 10-15 minutes.
What is SendGrid?
SendGrid is a “behind-the-scenes” service that actually sends your emails out — same idea as Amazon SES, just a different company.
Cyber Mail 9000 is your control panel (where you write emails, manage subscribers, and decide who gets what). SendGrid is the engine that delivers them. You bring your own SendGrid account, and you pay SendGrid directly.
Before You Start
You will need:
- A domain name you control (example:
yourbusiness.com) - Access to your DNS settings (usually where you bought your domain — Cloudflare, Namecheap, GoDaddy, etc.)
- A Cyber Mail 9000 account with a brand set up
Heads up about cost: SendGrid no longer has a free plan for ongoing sending. You’ll likely need a paid plan once you’re sending real campaigns. Check their current pricing on their website.
Step 1: Create a SendGrid Account
- Go to sendgrid.com and click Start for free (or Sign up).
- Enter your email and create a password.
- Confirm your email address from the message SendGrid sends you.
- Fill in the short questionnaire about your business when prompted.
You now have a SendGrid account.
Step 2: Authenticate Your Sending Domain (Don’t Skip This!)
Before SendGrid will deliver your mail, you have to prove you own your domain. This is required — Gmail and Yahoo now reject email from senders who skip this step.
- In SendGrid, go to Settings → Sender Authentication.
- Under Authenticate Your Domain, click Get Started.
- Pick your DNS host from the list (or choose “Other”) and enter your domain (example:
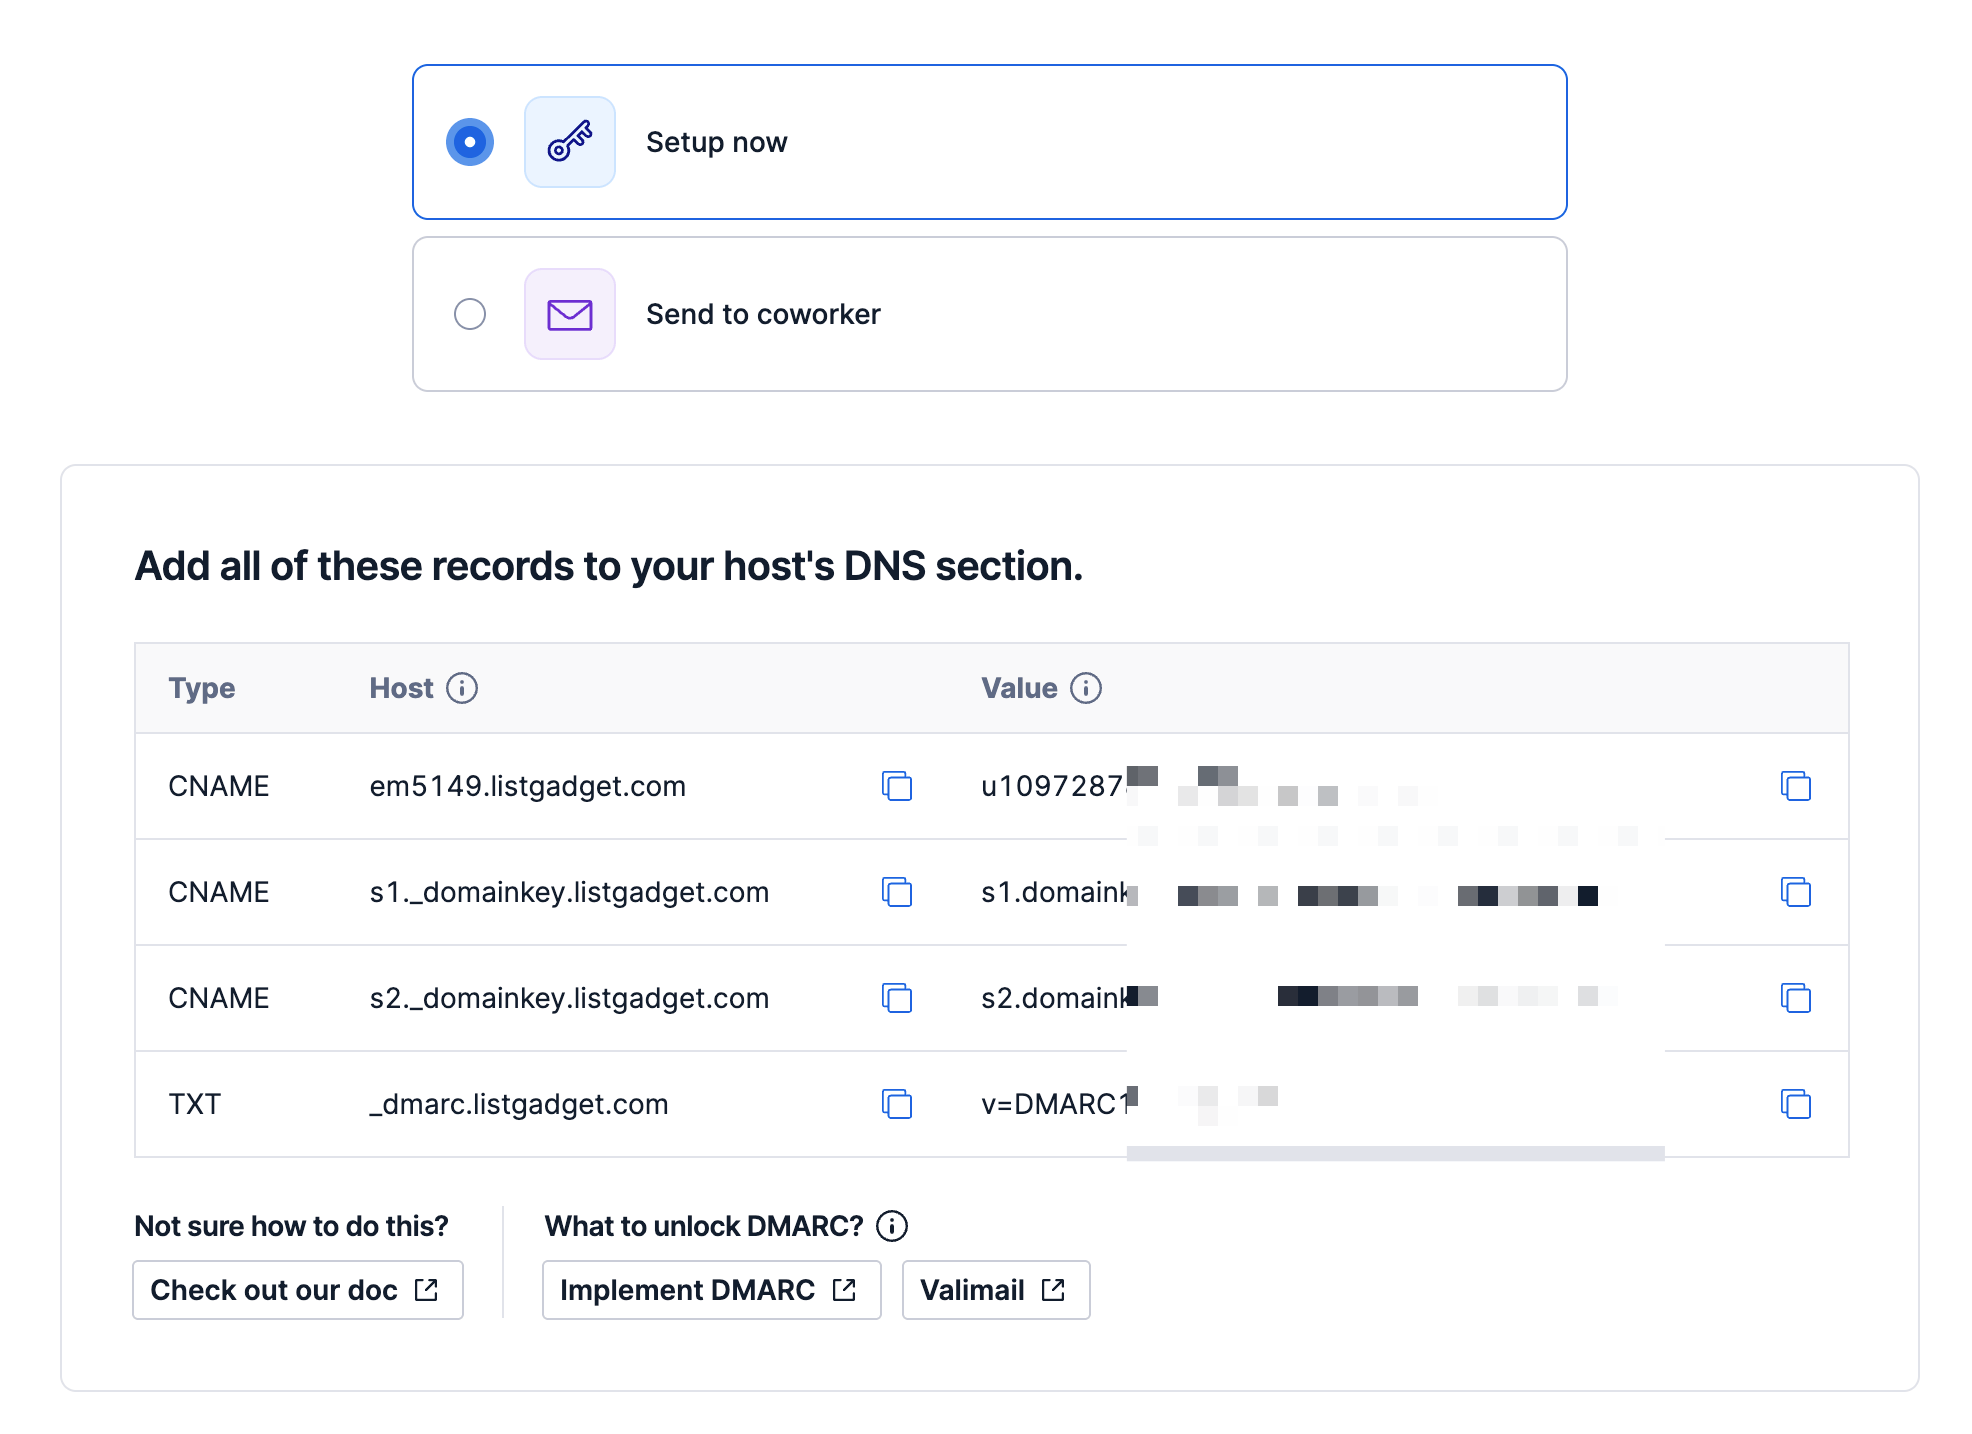
yourbusiness.com). - SendGrid will give you a handful of DNS records (CNAME records) to add.
- Go to your DNS provider and add each record exactly as shown.
- Back in SendGrid, click Verify.
It can take a few minutes (sometimes up to an hour or two) for the records to take effect. Once SendGrid shows Verified, you’re good.
Tip: Some DNS providers automatically add your domain to the end of the record name. If SendGrid says a record is missing but you added it, try removing the
.yourbusiness.comfrom the end of the record name.
Step 3: Create an API Key
This is the secret key Cyber Mail 9000 uses to send through SendGrid. Think of it like a password.
- In SendGrid, go to Settings → API Keys.
- Click Create API Key.
- Name it something like
cybermail9000. - Choose Restricted Access (or Custom Access)
- Scroll to Mail Send and set it to Full Access. (You can leave everything else off.)
- Click Create & View.
- Copy the key now and keep it somewhere safe. It starts with
SG.and SendGrid will only show it to you once.
Keep this tab open — you’ll paste this key into Cyber Mail 9000 in a moment.
Step 4: Connect SendGrid in Cyber Mail 9000
SMTP settings are saved per brand.
- Open your brand’s edit page at /brands and click your brand.
- Find the SENDING TRANSPORT section.
- Click the SMTP button (Amazon SES is selected by default).
- Fill in the fields:
- PROVIDER — choose
SendGrid - SMTP HOST — fills in automatically (
smtp.sendgrid.net) - PORT — leave it on
587 — STARTTLS (recommended) - USERNAME — type the word
apikeyexactly (this is literally the word “apikey”, not your email) - PASSWORD — paste the API key you copied in Step 3 (the one starting with
SG.)
- PROVIDER — choose
- Click VERIFY & SAVE →.
Cyber Mail 9000 will test the connection before saving. If your key is correct, you’ll see a success message and SMTP is configured.
The username really is just
apikey. That’s not a placeholder — SendGrid uses the literal wordapikeyas the username for every account, and your actual key goes in the password field.
Step 5: Send a Test Email
Once SMTP is configured, a Test Email section appears on the same page.
- FROM EMAIL — use an address at the domain you verified in Step 2 (example:
hello@yourbusiness.com). - TEST EMAIL ADDRESS — enter your own email so you can check it.
- Click SEND TEST EMAIL.
- Check your inbox (and your spam folder if you don’t see it within a minute or two).
If it arrives, you’re set up correctly. 🎉
Step 6: Set Up Bounce & Complaint Tracking
This lets Cyber Mail 9000 automatically stop emailing people whose addresses bounce or who mark you as spam — which protects your sending reputation.
After you save your SMTP settings, a Bounce & Complaint Webhook section appears with a special URL just for your brand.
- In Cyber Mail 9000, click COPY to copy your webhook URL.
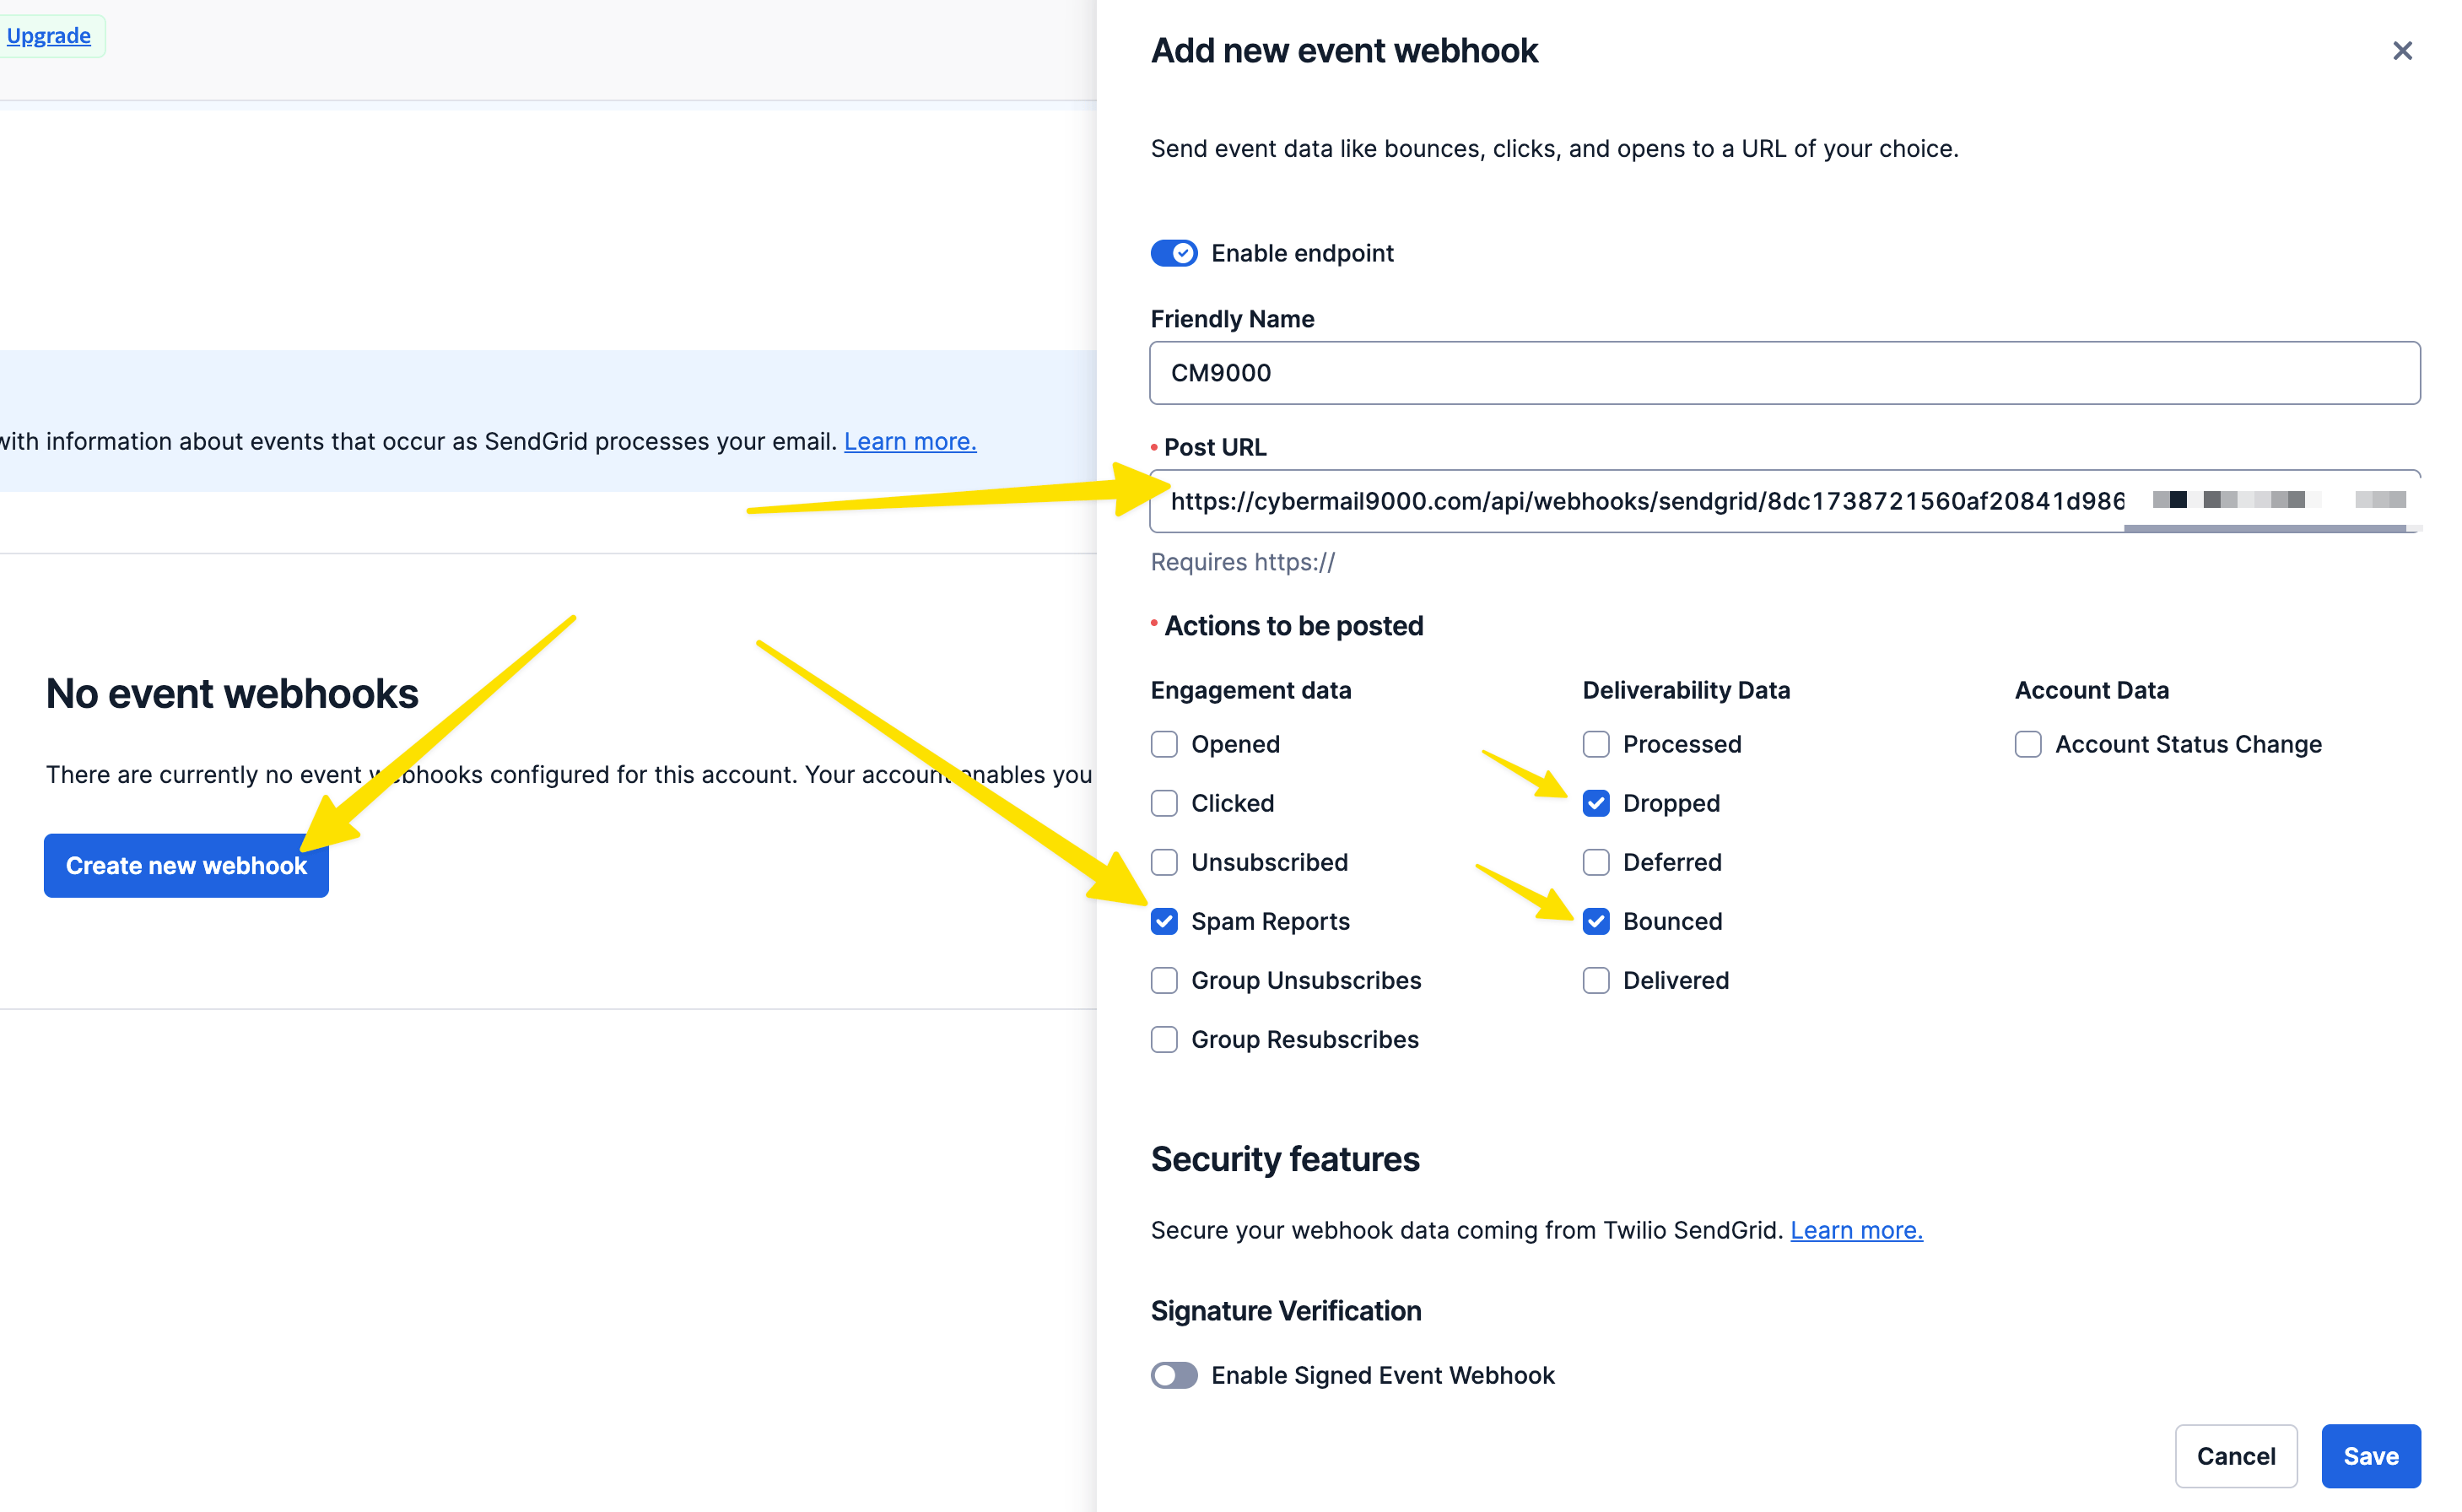
- In SendGrid, go to Settings → Mail Settings → Event Webhook.
- Paste your URL into the HTTP POST URL field.
- Turn on these events: Bounced, Dropped, and Spam Reports.
- Save it in SendGrid.
Keep that URL private. It contains a secret token unique to your brand. Don’t share it or post it anywhere public.
Optional: Extra security
SendGrid offers a feature called Signed Event Webhook. If you turn it on in SendGrid, copy the verification key it gives you and paste it into the SIGNED EVENT WEBHOOK KEY field on your brand page, then save again. This is optional — leaving it blank still works fine.
Common Problems
“Verification failed” when saving credentials
Double-check your username is the literal word apikey and that you pasted the full API key (starting with SG.) into the password field. If you lost the key, just create a new one in SendGrid (Step 3) — old keys can’t be viewed again.
Test email doesn’t arrive
- Make sure your FROM EMAIL uses the domain you verified in Step 2.
- Confirm your domain shows Verified in SendGrid (Settings → Sender Authentication).
- Check your spam folder.
Emails go to spam
This almost always means your domain isn’t fully authenticated. Go back to Step 2 and confirm every DNS record is in place and SendGrid shows Verified.
A Note on Sending Responsibly
You are the sender of record. Only email people who gave you direct, verifiable permission. Purchased, rented, or scraped lists are prohibited and will wreck your deliverability — fast.
Before your first campaign, read:
Next Steps
Once SendGrid is connected and your test email works:
- Import contacts in Subscribers
- Create a campaign in Broadcasts
- Send it using your configured brand sender